
 Introduction to Mini App-IDE
Mini App-IDE, whose full name is Neuxnet Integrated Development Environment, Chinese name is "Neuxnet Mini App Developer Tool", is a Mini App developer tool launched by Neuxnet for Mini App developers.
It can help Mini App developers to complete the basic functions such as Mini App development, debugging, preview, uploading, etc., and Mini App-IDE can run on Windows and Mac multi-platforms, thus helping developers develop Mini Apps more efficiently.
This article will help you quickly understand and understand Mini App-IDE by introducing the different components of Mini App-IDE, so as to better complete the development of Mini Apps.
# 1. Mini App-IDE interface and features
# 1.1 Mini App-IDE main interface
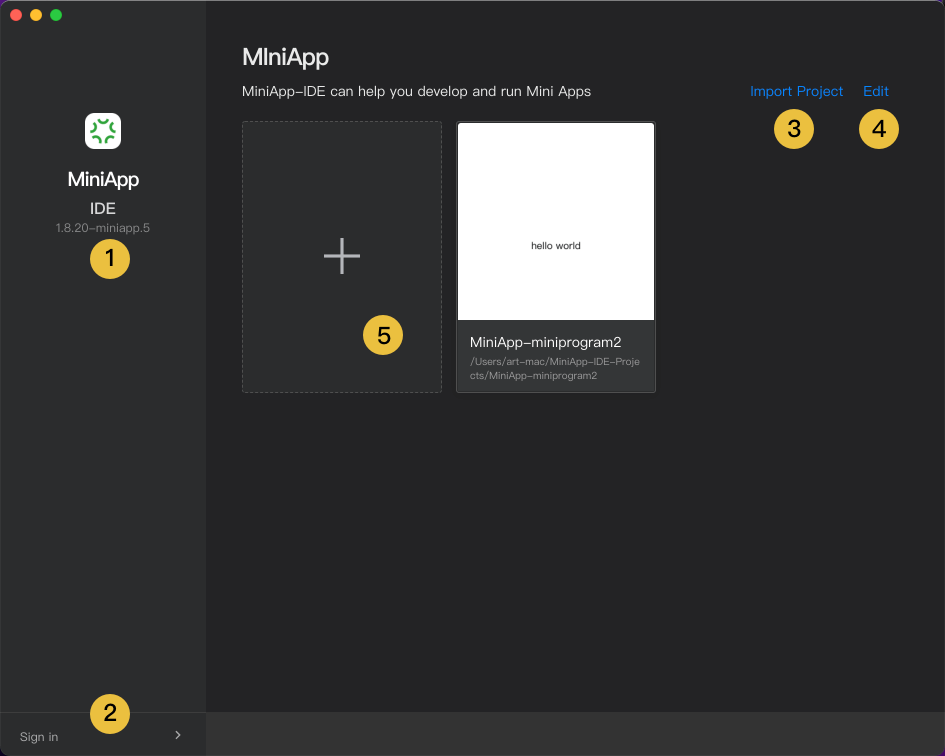 When you install and open Mini App-IDE, you can see the corresponding interface in the above figure, where:
- Version Hints and Checks: You can view the version of the IDE you are currently using, and click to update the version
- Mini App Code Compatibility Check Tool: You can check the compatibility of existing Mini App code packages to see if the functions in the current Mini App are available in Neuxnet
- Developer Documentation: Quickly open the Neuxnet developer documentation
- User login: You can log in to Mini App-IDE using your mobile phone verification code, scan code or account password
- Open Project: Open an existing MiniApp project
- Manage items: Manage the deletion of MiniApp items that already exist in Mini App-IDE
- New Project: Create a new Mini App project
# 1.2 Sign in to Neuxnet
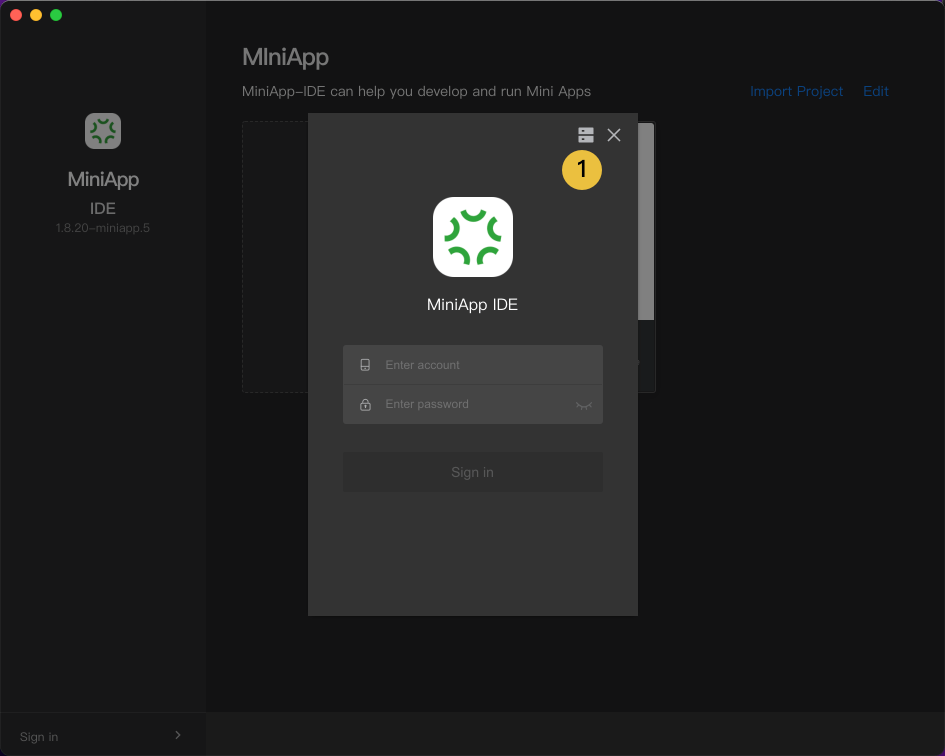 When you use the environment in Neuxnet.com, you can use the account password (such as 1 mark), SMS verification code (such as 2 marks), and mobile Neuxnet App scan code (such as 3 marks) to complete the Neuxnet account login.
If the version you are using is a privatized version (including the joint regulation application market) or the community version, please click the server switch button in Figure 4 above, select the corresponding server environment according to your needs in the newly opened pop-up window, and then complete the user login operation 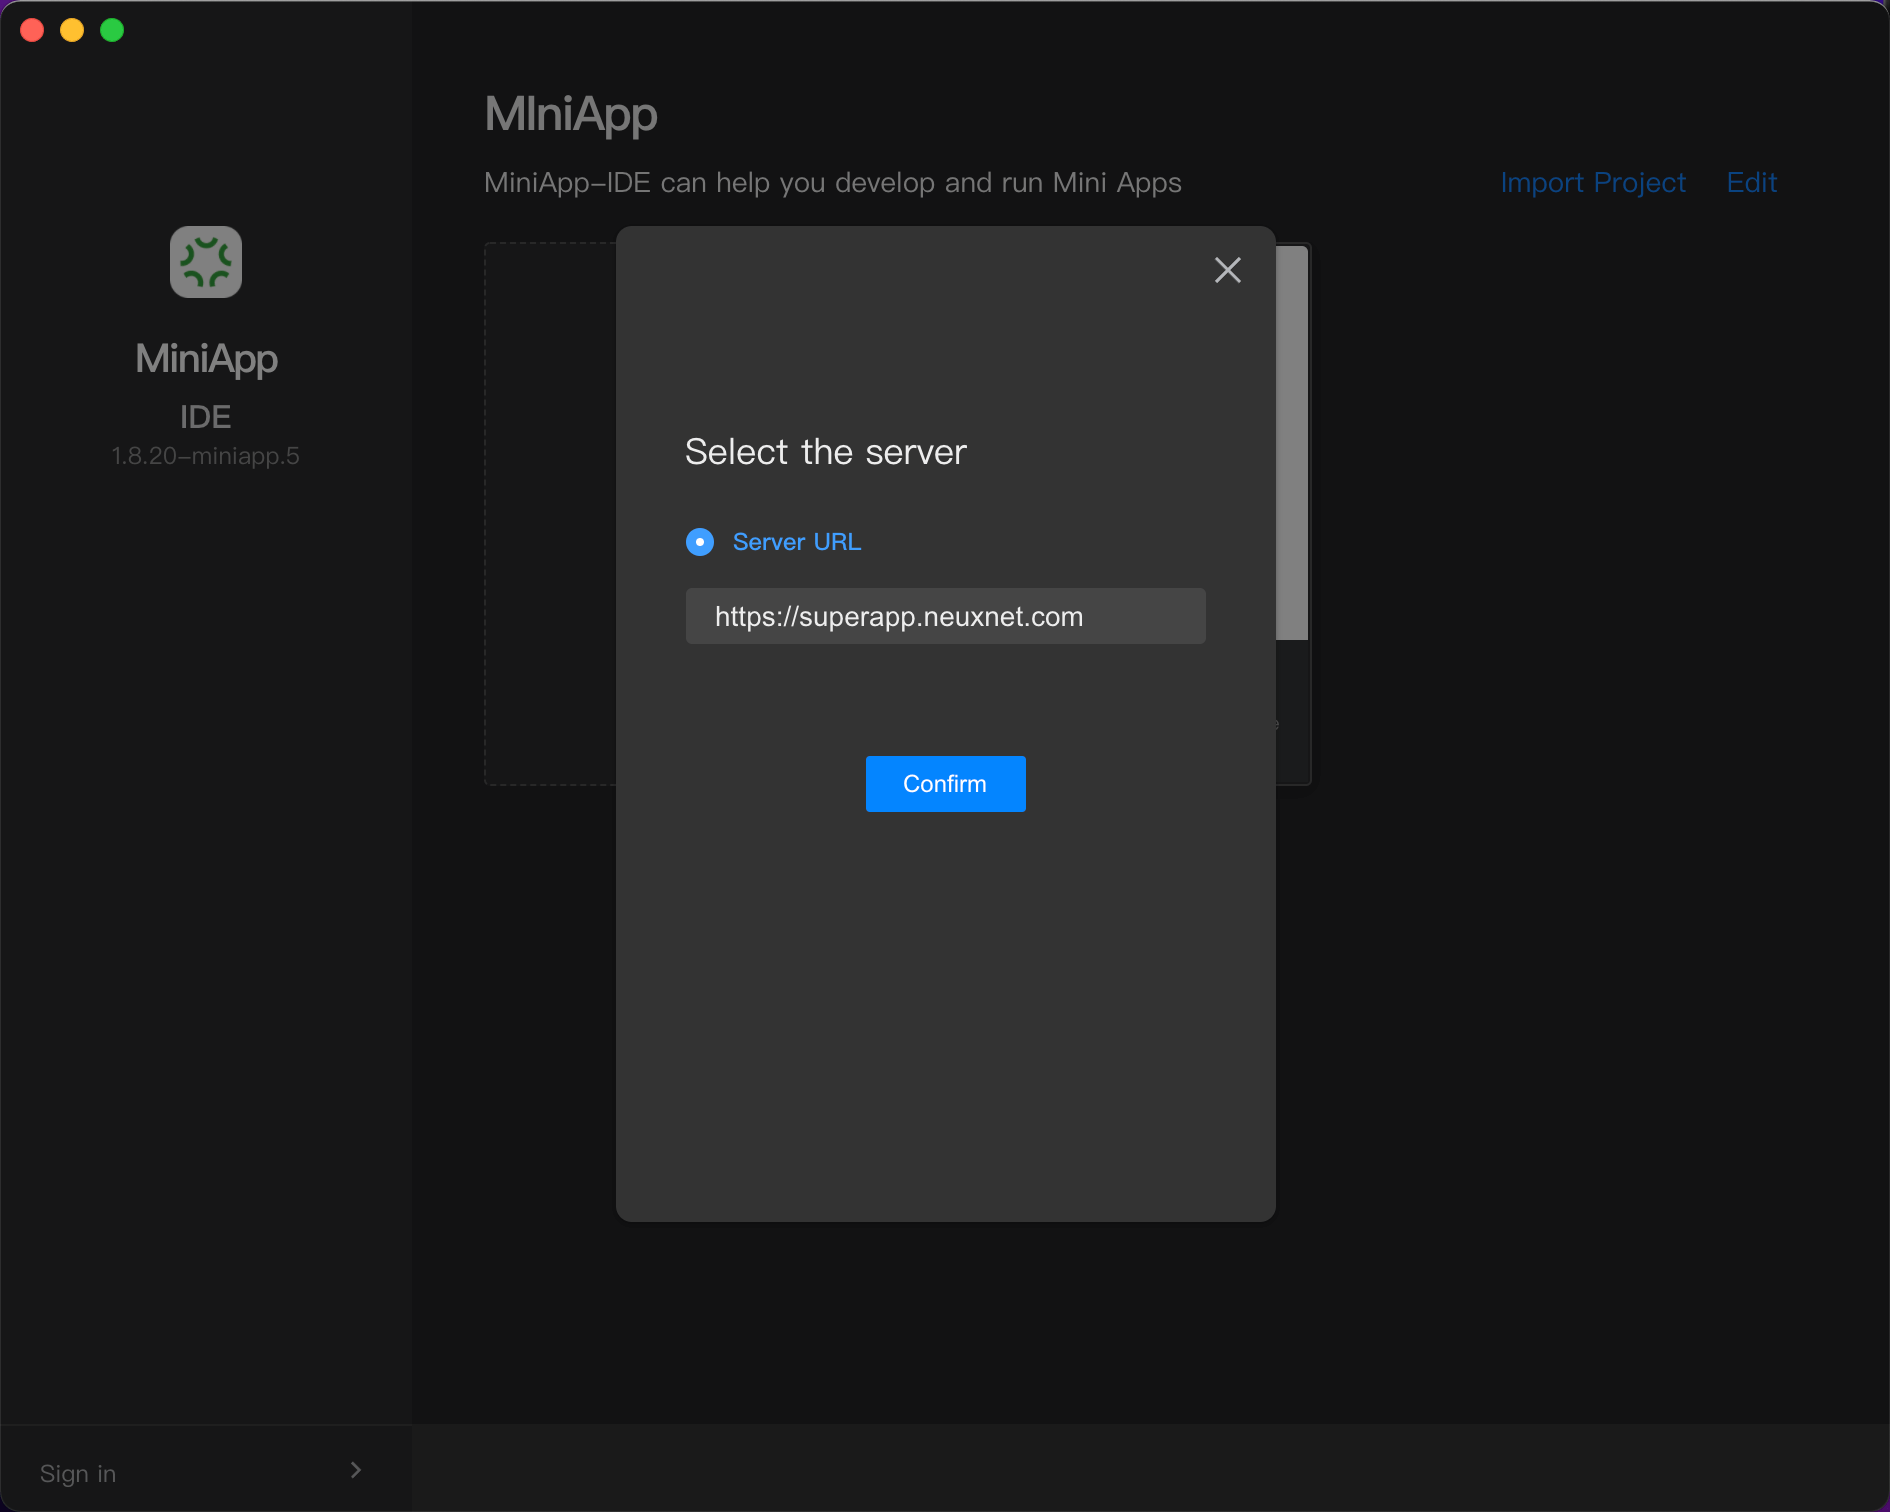
# 1.3 Create a new project
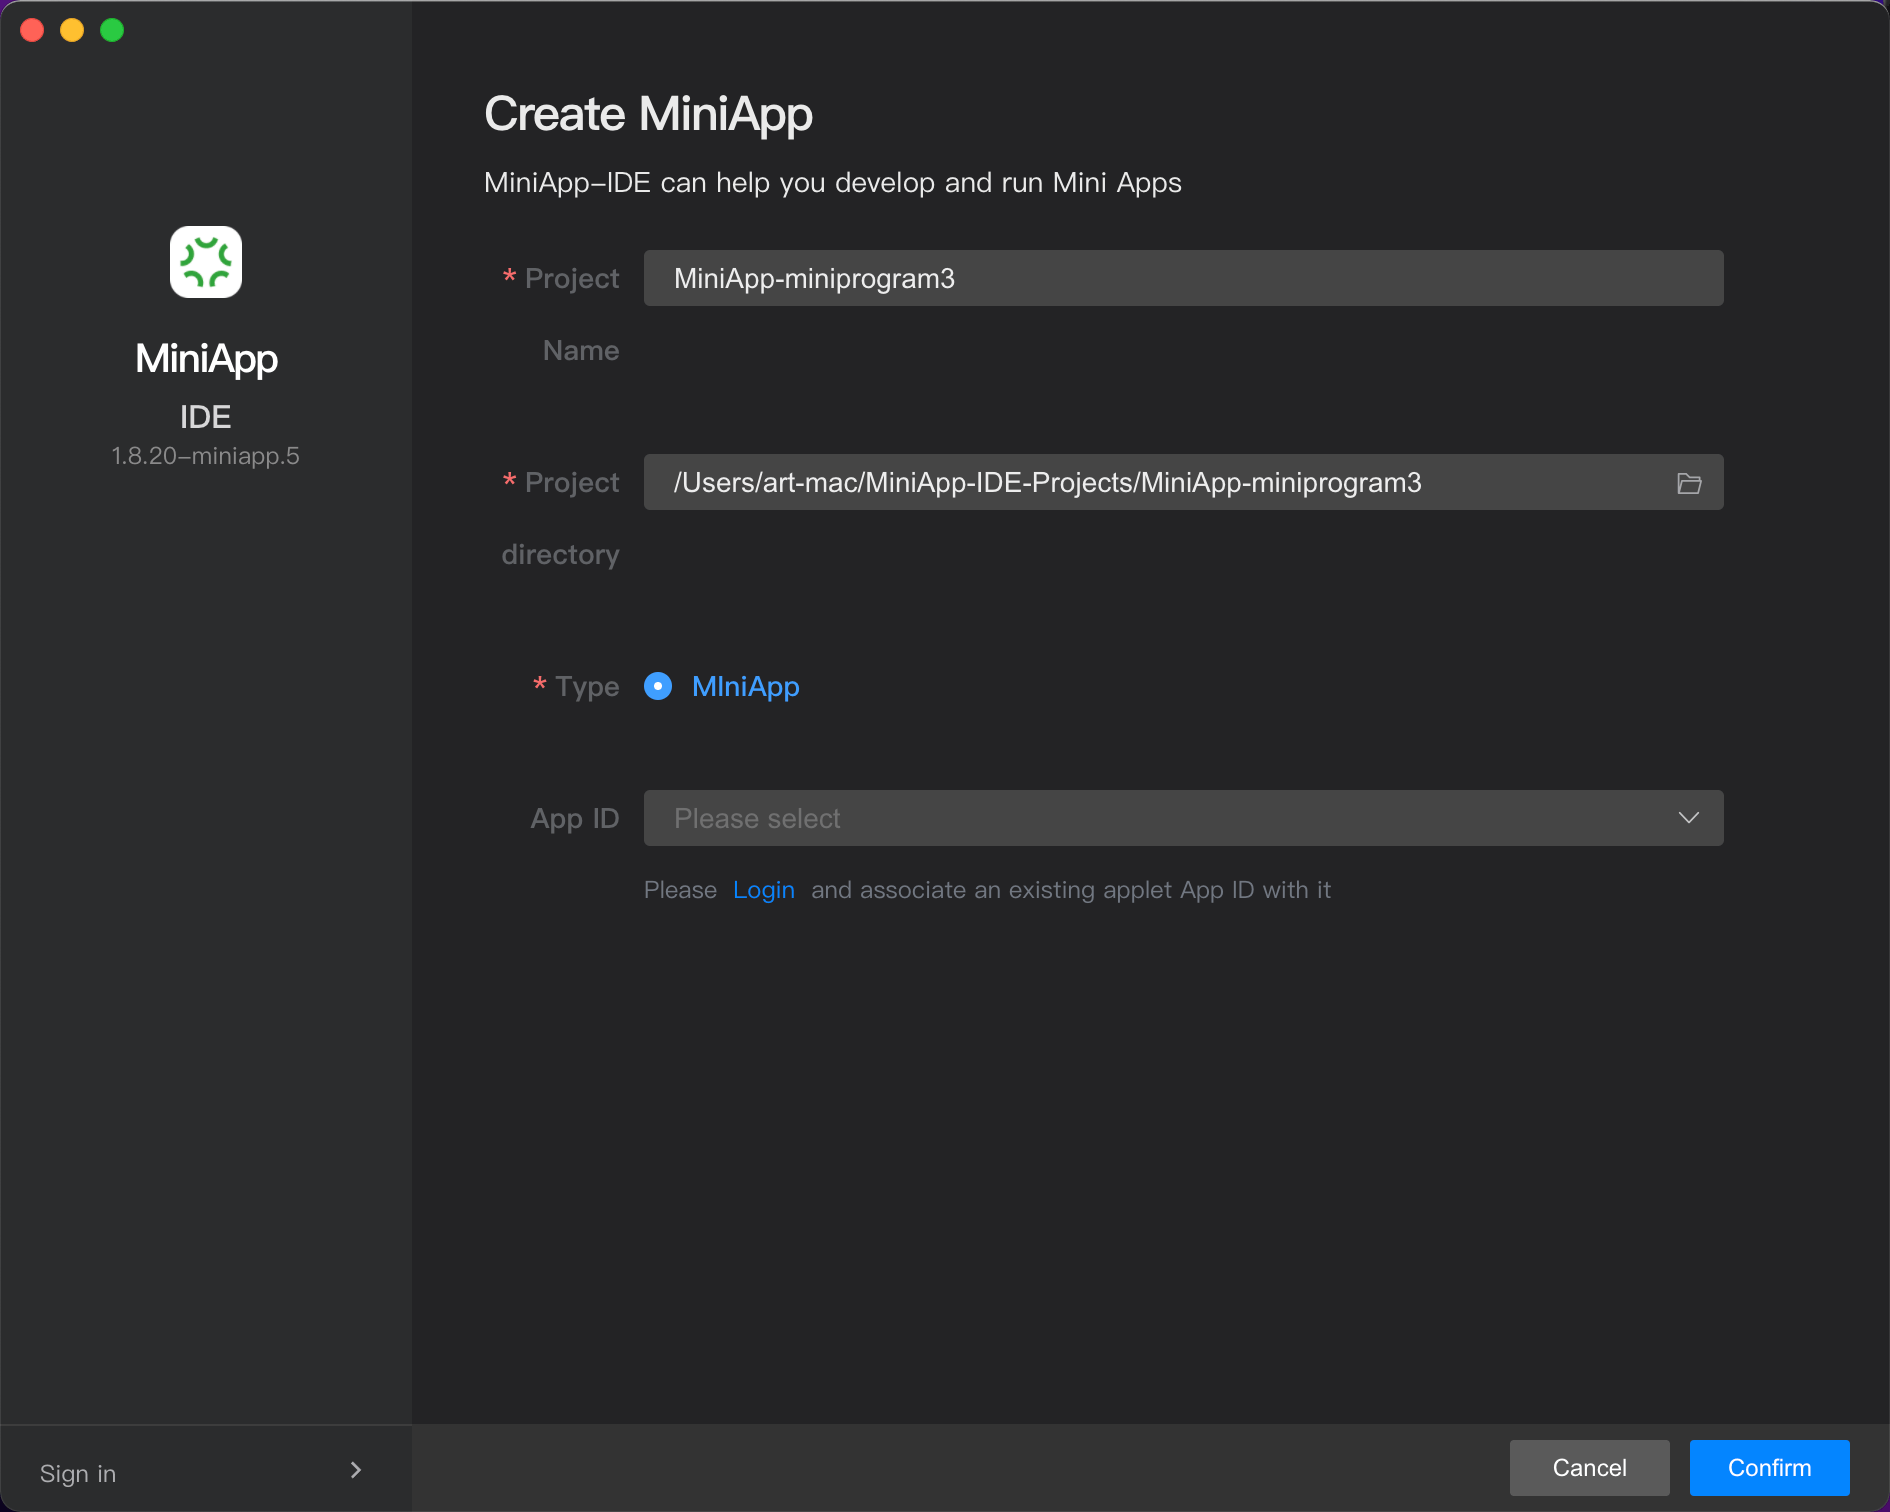 When you click the "New" button, the "Create Mini App" page will open, where you need to confirm:
- Project Name: The name of the new Mini App that needs to be created
- Project Directory: The file directory where the MiniApp source code is located (it is stored in the current user directory by default)
- Project Type: Mini App or Mini App Plug-in (cannot be changed once selected)
- Project template: you can choose from "blank template", "Mini App Sample Template" and "Webview";
- App ID: You need to create a new Mini App in Neuxnet to get an AppID (only required for upload)
# 1.4 Main interface
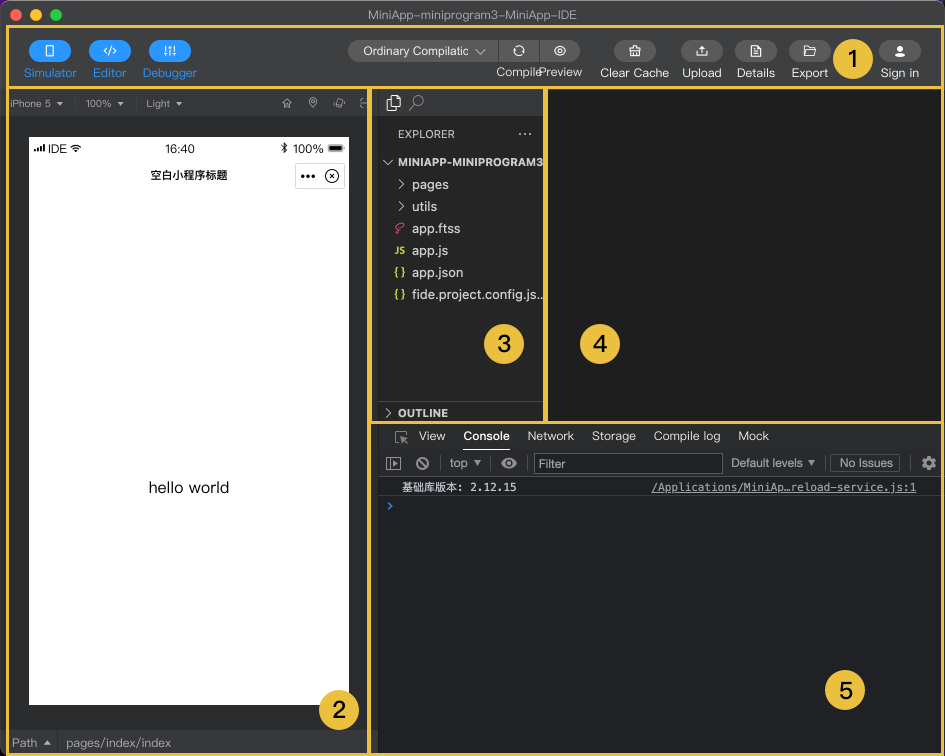 As shown in the figure above, the main interface of Mini App-IDE is:
- Toolbar: Can show close different panels, open document center, compile or other operations
- Simulator: You can simulate the use effect of the preview Mini App, and you can also set different models and display scales to view and adjust the preview effect
- File Manager: You can view the structure and content of the directory, and add new files or folders. Click on any file to see the specific content in the document on the right, and the content editor is collectively referred to as the "editor"
- Content Editor: Code content can be modified, and file managers are collectively referred to as "editors"
- Debugger: You can debug the Mini App code and view errors or other prompts
# 1.5 Window menu with shortcut keys
To help developers quickly and easily develop Mini Apps using Mini App-IDE, you can also do this through window menus or shortcut keys:
- New Project: Shift+Command(Ctrl)+N
- Open Project: No shortcuts yet
- Close the current project: Shift+Command(Ctrl)+W
- Close the current file: Command(Ctrl)+ W
- Save file: Command(Ctrl)+S
- Save all: Option(Alt) + Command(Ctrl)+ W
- Undo: Command(Ctrl)+ Z
- Cut: Command(Ctrl)+ X
- Copy: Command(Ctrl)+ C
- Paste: Command(Ctrl)+ V
- Find: Command(Ctrl)+ F
- Global search: Shift+ Command(Ctrl)+F
- Replace: Command(Ctrl)+ H
- Select All: Command(Ctrl)+ A
- Copy one line up: Option(Alt)+Shift)+↑
- Copy down one line: Option(Alt)+Shift)+↓
- Move one line up: Option (Alt) + ↑
- Move down one line: Option (Alt) + ↓
- Back: Option(Alt)+ ←
- Forward: Option (Alt) + →
- Go to file: Command(Ctrl)+P
- Go to line: Command(Ctrl)+ G
- Open and hide emulators: Shift+Command(Ctrl)+D
- Open, hide editor: Shift+Command(Ctrl)+E
- Open and hide debuggers: Shift+Command(Ctrl)+I
- Compile: Command(Ctrl)+B
- Preview: No shortcuts yet
- Upload: No shortcuts
- Delete app data: No shortcuts yet
- Build npm: No shortcuts yet
# 1.6 Toolbar
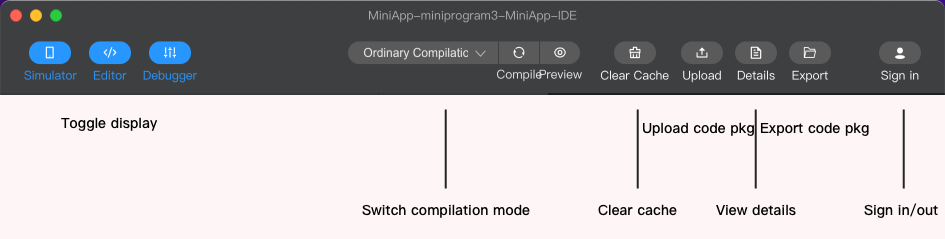
- Emulator, Editor, Debugger: Toggle the switch of the corresponding panel below
- Documentation: The "Mini App-IDE" how-to document will be redirected and opened
- Switch the compilation mode: Configure the corresponding compilation mode (such as configuring the startup page, parameters), and perform compilation and preview operations
- Real machine debugging: Let the developer debug the Mini App in the real machine, and all the operation information will be transmitted back to Mini App-IDE
- Clearing: Simulate Mini App debugging after clearing cache (support 3 modes of clearing file cache/clearing compilation cache/clearing all)
- Upload: Upload the current Mini App code package to the version directory of the Mini App to which it belongs
- Details: Check the version of the MiniApp's basic library, configure UA information, etc
- Export: You can export the current MiniApp as a code package in .zip format or as an offline package
- Generate App: Convert the Mini App into the corresponding App Project or other file
# 1.7 Emulator
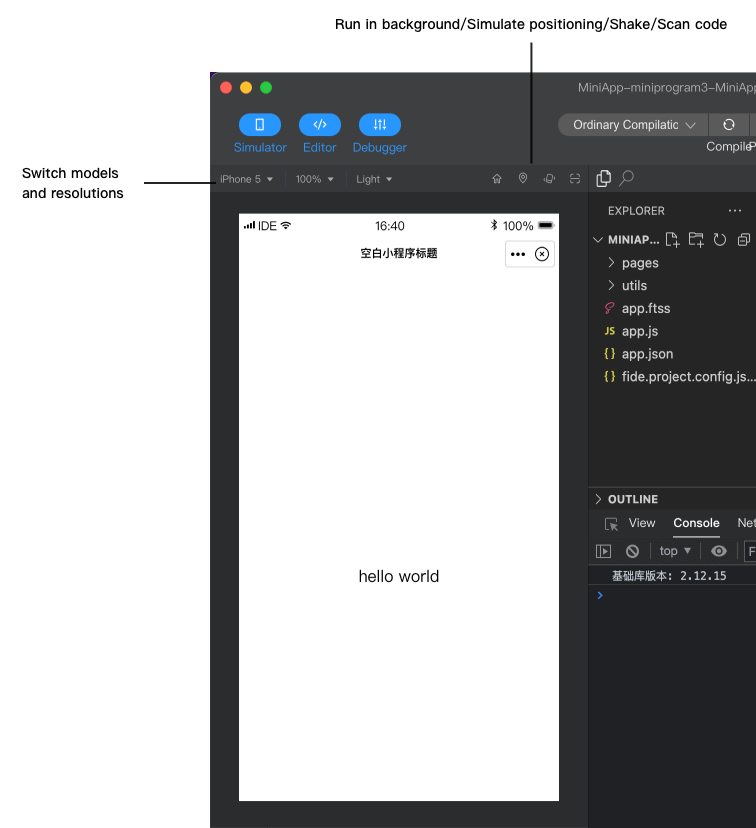 The emulator can reflect the real logic representation of the Neuxnet MiniApp on the client side, and the vast majority of APIs can show the correct state in the emulator. You can switch the model and resolution through the button in the upper left corner to debug the adaptation problem of the small program in different size models.
In addition, the operation button in the upper right corner can also simulate the operation of "cutting the background/simulating positioning/shaking/scanning the code" of the Mini App respectively, so as to simulate the relevant business logic in the Mini App.
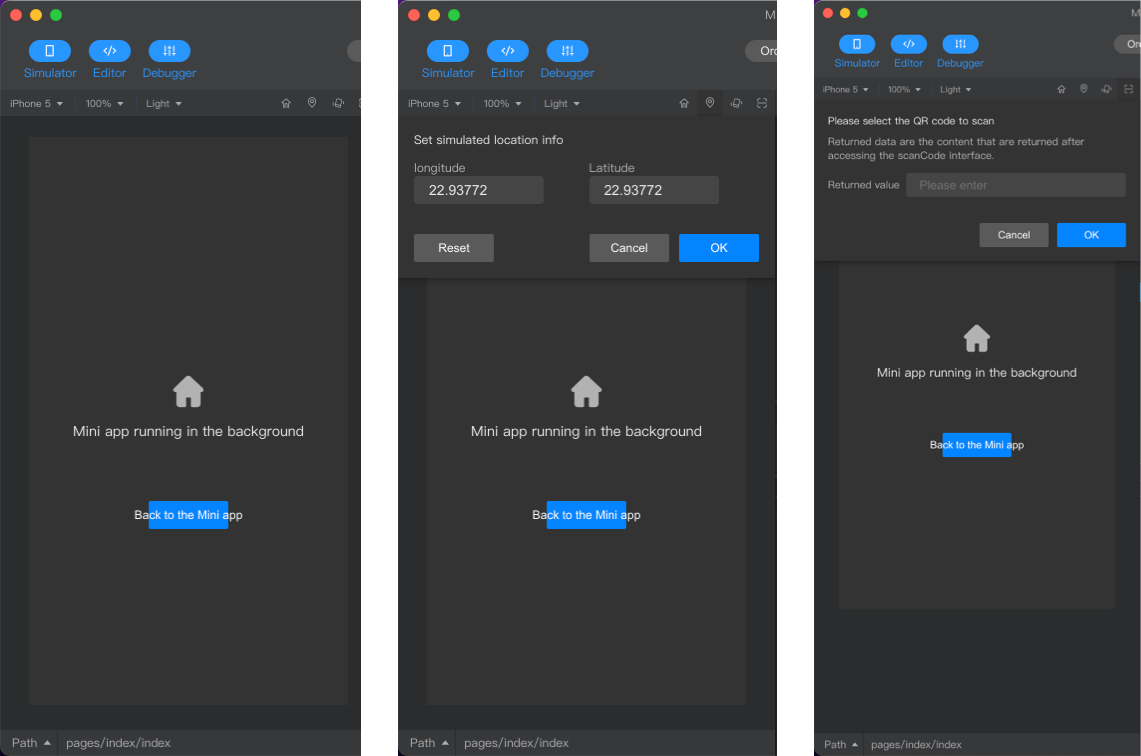
The page path and parameter information at the bottom can help you quickly locate the page position and related open parameters, and find problems as soon as possible during test debugging.
# 1.8 File Manager
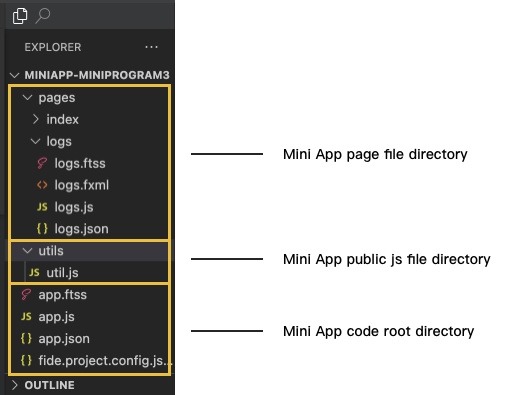 File Manager can help you view the files related to the Mini App, we can see a total of 5 Mini App application-level files under the "Mini App Code Root Directory", namely:
- App.ftss MiniApp global public style file
- App .js Mini App logic file
- App.json MiniApp configuration file
- fide.project.config.json project configuration file
- sitemap.json MiniApp index sitemap
In addition, there are two folders parallel to these 5 files, namely "pages" and "utils", where the "pages" folder is used to store the specific directory of each page in the Mini App.
As shown in the figure above, we will see that there are also two directories under the "pages" directory, "index" and "logs", which are actually used to refer to the corresponding files in the two pages of "index" and "logs". In each page, it consists of the following 4 files (in the case of index pages, all the file names in the actual directory of each page must be the same):
- index.ftss page style file
- index.fxml page structure file
- index.js page logic file
- index.json page configuration file
# 1.9 Content Editor
The editor module allows you to code write and add, delete, and rename files to the current project.
- File support: The tool currently provides editing of 4 types of files: fxml, ftss, js, json, and previews of files
# 1.10 debugger
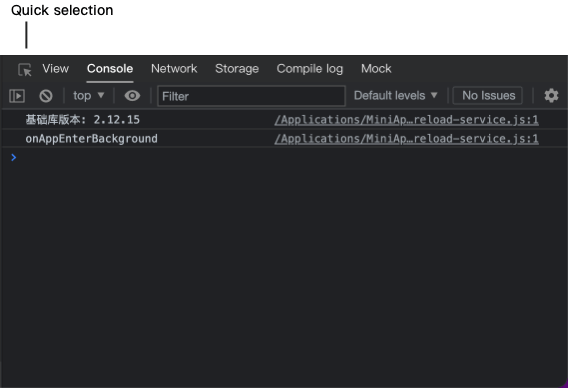 The debugger contains the following functional modules:
- Quick Select: You can quickly locate the ftml code corresponding to the component in the page
- View: View the ftss properties corresponding to the real page structure and structure, and see the modifications in real time in the emulator by modifying the corresponding ftss properties
- Logs: Developers can debug code here
- Network: Used to observe and display requests for requests and sockets
- Storage: Used to display and modify the data attribute of the current page
- Compilation Log: Used to observe and display the compilation process and error messages of the Neuxnet Mini App
- Api Mock: Used to modify the callback content of the test APIs